
PROJECTS PROTOTYPES PATENTS PRODUCTS PROGRAMS PRECISION
Hardware Firmware Software Engineering
Hardware Firmware Software Engineering
System Developer for Internet of Things, New Inventions & Automation
KASSIE2 - MULTI PROBE TEMPERATURE MONITOR WITH A CONTROL FUNCTIONALITY

PEET
LAB
LAB
KASSIE2 is a multi probe temperature controller and monitoring device that can be used to automatically log and upload sensor data to a webserver. The device can handle up to 8 temperature probes, all connected to a single data line. KASSIE2 is good to monitor temperatures in industrial environments. Food Processing Industries, Wine Cellars, Cold Rooms, Medical Storage Facilities, etc. KASSIE2 reports immediately temperatures outside the set limits to various interested parties which may include technical personnel. No need for a computer to run KASSIE2.
Main Features
1. Monitor up to 8 temperature probes (18B20)
2. Able to control up to 8 cooling units
3. Temperature Range : -55ºC to 125ºC
4. Temperature Resolution : 0.125ºC
5. Max Probe Distance : Up to 300m
6. IoT - Global Data Access
7. Actual/Historical/Graphical Reports
8. Email Notifications & Alarm Acknowledgements
9. Upload frequency options: every15min; 30min; 1hr , 3hr, 6hr
10. Wifi down Internal Storage : up to 1000 transactions
11. Database Records: 3 months, with unlimited option
12. Controlling High and Low limits for each probe.
The KASSIE2 Unit requires permanent 220V,50Hz power and 2.4G Wifi. When Wifi is unavailable, the unit will carry on storing up to a 1000 transactions for dumping later.
KASSIE2 is the next generation of the first product named KASSIE launched in 1990. The device is named after my father and late electrical contractor, "Kassie Hendriks", who inspired me with his passion for building the smartest cold rooms.
KASSIE2 Components
1. KASSIE2 Device
2. 8 x Sensor Stations
3. Probe Setup Cable
4. Kassie2Mobile App - Andriod
5. Kassie2Desktop App - Windows
6. Cloud database -MySQL
7. License information
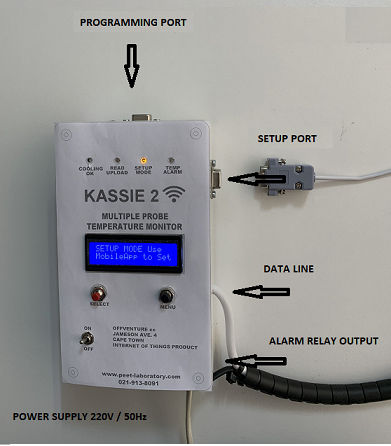
KASSIE2 EXTERNAL CONNECTIONS
1.Programming Port
2. Setup Port
3. Data Line
4. External Alarm Switch
5. 220V/50Hz Power Supply
6. 2.4 G Wifi signal
KASSIE2 - NORMAL OPERATION
When setup properly, the device will run repeatedly through the following sequence:
1. Take sensor readings and upload data to webserver
2. Take sensor readings and save data internally
3. While waiting for the next scheduled upload, the device will :
(a) measure and display temperature one sensor after the other.
(b) For each of the 8 probes, switches a relay ON or OFF between the user defined temperature limits. Normally switch off when the LOW limit is reached, and ON again when the HIGH limit is reached.
(c) provide an option to enter the device's MENU
(d) repeat (a) and (c) continually - wait stage
4. Operation return back to step1.
All readings are taken and saved with datetime stamp.
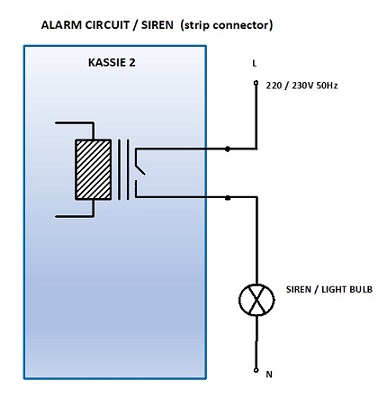
KASSIE ALARM CONDITIONS
In the case of a sensor reporting a temperature outside the set limits, KASSIE2 will close the relay contacts which can in turn activate a siren or warning light (see electrical circuit). Warning Emails will also be sent to all interested parties. GMail on mobile phones make it convenient to get email notifications immediately. The email will contain the name of the alarming station, the temperature and date & time.
Relevant email addresses are required by PEETLAB to built it into the UPLOAD Command. In the MENU OPTIONS below, it will be explained how to reset a temperature alarm.
ALARM ACKNOWLEDGEMENTS
When an alarm email is received, the receiver may respond to acknowledge the notification whereby further alarm emails will not be send out on that day for that station.
Acknowledgements is done per probe station valid only for the day it is sent. The Acknowledgements is done via the Mobile Application only.
KASSIE2 MENU OPTIONS
The device will prompt the user (message on LCD) to enter the MENU. The message will appear regularly while in the wait stage. The WAIT stage is the time interval between the scheduled data uploads. On MENU prompt, the user must press the BLACK button to enter the MENU. The BLACK BUTTON will proceed to the next menu item while the RED BUTTON will SELECT a menu item. The response time of the buttons are relative slow, please wait 0.5 - 1.0 seconds before pressing again.
1. Reset the Temperature Alarm - disabled
2. Display each sensor's label & temperature limits
3. List Sensors/probes with serial numbers
4. Count the active number of sensors on the dataline
5. Dump Internal Data to the webserver
6. Reconnect to the Internet = disabled to save memory
7. Exit the MENU
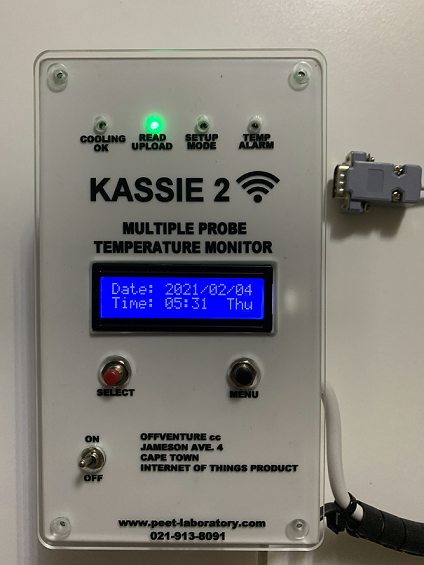
KASSIE2 LEDs
There are four LEDs :
Blue : Indicates cooling is between the temperature limits
Green : Device is busy reading, saving or uploading data
Orange : Indicated the SETUP MODE has been entered.
Red : Indicates a temperature alarm condition.
The device continually indicates the status as it runs through the read,upload,save,setup and wait conditions.
KASSIE2MOBILE APP - Andriod only
Purpose of App :
1. To do the initial Setup of the device.
2. Accessing the Webserver and Temperature Reports.
Registering the App Online:
1. Run the app, click on Register
2. Read and Accept the Terms&Conditions (can be viewed)
3. Click on DOWNLOAD REGISTRATION
4. Wait for message "Download Complete!", then click OK.
5. Enter the code received from our office : +27 219138091
Company Name is required.
6. Click on Register, wait for message "Successful", then Exit
KASSIE2 SETUP
When the device is switched on, it will go by default into the SETUP mode until it has been marked as set up.
Initial Setup procedure to follow:
1. Power up and switch on the device.
2. Wait for the "Setup mode" message.
3. Go to the "Wifi Settings" of your mobile phone.
4. Select the KASSIE2 wifi network.
Default Password : heila
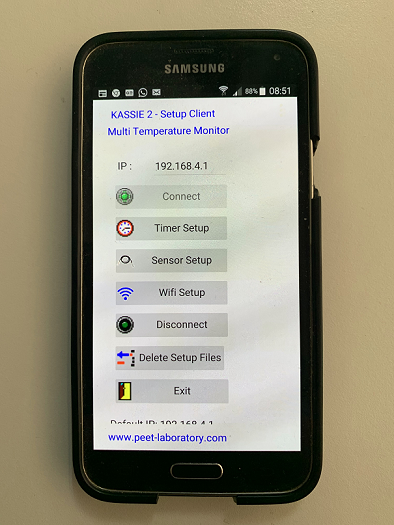
5. Open the KASSIE2MOBILE app.
6. Select SETUP HARDWARE
7. Select CONNECT
8. The following MENU will appear :
(a). Timer Setup
(b). Sensor Setup
(c). Wifi Setup
Complete each Setup Item.
TIMER SETUP - Kassie2Mobile App
Select the correct Date and Time to adjust the Date and Time of the device, then select one of five possible temperature reading frequencies (every 15min, 30min,1hr,3hr,6hr)
Click on UPDATE UNIT. The KASSIE2 Device will respond immediately by displaying the date/time sent on the LCD Display.
Click CLOSE on the app to select the next SETUP item.
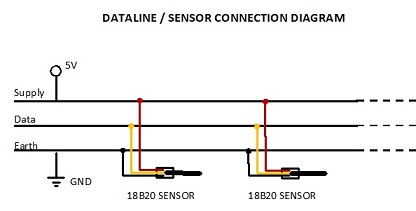
CONNECTING OF PROBES
Black = GND; Red = 5V ; Yellow = Data
Connecting probes for setup
The temperature sensors (18B20) must be set up one by one. Each probe must be connected to the SETUP PORT (right side of the unit) through the included SETUP CABLE.
Procedure to follow :
(a) Unplug the SETUP cable from the port. (device can be switched on)
(b) Connect the probe/sensor wires.
(c) Plug in the SETUP cable (even when device is switched on)
(d) Proceed with the SENSOR SETUP
(e) Repeat steps (a) to (d) above for the other probes. One at a time.
Warning : Do not use the PROGRAMMING PORT on top of the device for this purpose.
Connecting probes for normal operation
Before connecting/adding/replacing any sensors/probes to the DATA LINE, the device must be switched off.
The device can then only be switched on with all the sensors wires properly connected in parallel to Vcc (5V), GND and Data.
SENSOR SETUP - Kassie2Mobile App
The temperature sensors (18B20) must be set up one by one. Each probe must be connected to the SETUP PORT (right side of the unit) through the included SETUP CABLE.
Warning : Do not use the PROGRAMMING PORT on top of the device for this purpose.
Then label the probe with any tag to identify it from other probes on the system. Giving it a name which identify a location is a good idea. The reports will refer to this name/label.
Example : Coldroom Front, Coldroom Door, Outside, Precooler..
Warning: See recommended procedure for connecting the probes.
(a). Select a Probe number ( Probe1 to Probe 8)
(b). Click GO
(c) Assign a name to the probe (label)
(d) Enter the LOW level value, and mark the checkbox with a tick if the value is negative. A temperature below this value will trigger an alarm.
(e).Enter the HIGH level value, and mark the checkbox with a tick if the value is negative. A temperature beyond this value will trigger an alarm.
(f). Check MAKE PROBE ACTIVE for the system to know which of the possible 8 temperature stations are used.
(g). Click SAVE. then.
(h). Click UPLOAD.
On UPLOAD, KASSIE2 will respond immediately. It will display the label of the probe on the first LCD line, and on the second LCD line it will display the probe station number, the low value, the high value and another 3 digits. The first two digits represent the sign of the values. "1" = negative, "0" = positive. The last digit : "1" = probe is marked active, "0" = probe is not marked active and system will ignore it on reports. The LCD display will last 3 seconds and it will read and show the serial number of the probe.
(i). Repeat steps (a) to (h) above for setting up the next probe or click CLOSE to exit the SENSOR SETUP page.
WIFI SETUP - Kassie2Mobile App
Select WIFI SETUP and enter the credentials of your Wifi access.
The fields must be entered one by one. After each field, click the RED UP ARROW next to the field to UPLOAD. The KASSIE2 device will then respond on the LCD Display with the value of the field sent.
(a). SSID & Password is required to access the internet on site.
(b). DUMP COMMAND - provided by PEETLAB. The command to dump temperature recordings saved by KASSIE2. It will upload to a seperate database on the webserver. Up to a 1000 readings (the latest values) are stored on the device itself.
(c). UPLOAD COMMAND - provided by PEETLAB. The command to upload actual values periodically on the website. The period is set in the TIMER SETUP menu = Temperature Reading Frequency.
(d). Check the UNIT SETUP COMPLETED field if you are finish with to total setup. By "checking" this field, the KASSIE2 device will not go automatically into the SETUP MODE after startup, it will instead link up to the internet and start uploading temperatures.
(e). Click CLOSE to exit the WIFI SETUP.
CLOSING THE KASSIE2MOBILE APP
To finish the setup, click on DISCONNECT to leave the SETUP MODE and break the WIFI connection between the MobileApp and the KASSIE2 device, which is only required during setup.
ENTER SETUP MODE AFTER THE INITIAL SETUP
To add/delete probes at a later stage, device must be switched off, wait for 10 seconds, switch on again. Wait for the setup mode message to appear and press and hold both buttons for at least 3 seconds. The device will go into the SETUP MODE
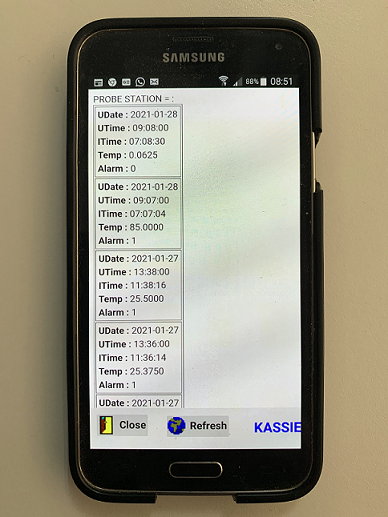
KASSIE2 - MOBILE APP REPORT
Wherever Internet connectivity is available, temperatures with datetime stamp per station can be viewed. The number of mobile installations for interested parties is not limited.
KASSIE2 - DESKTOP APP
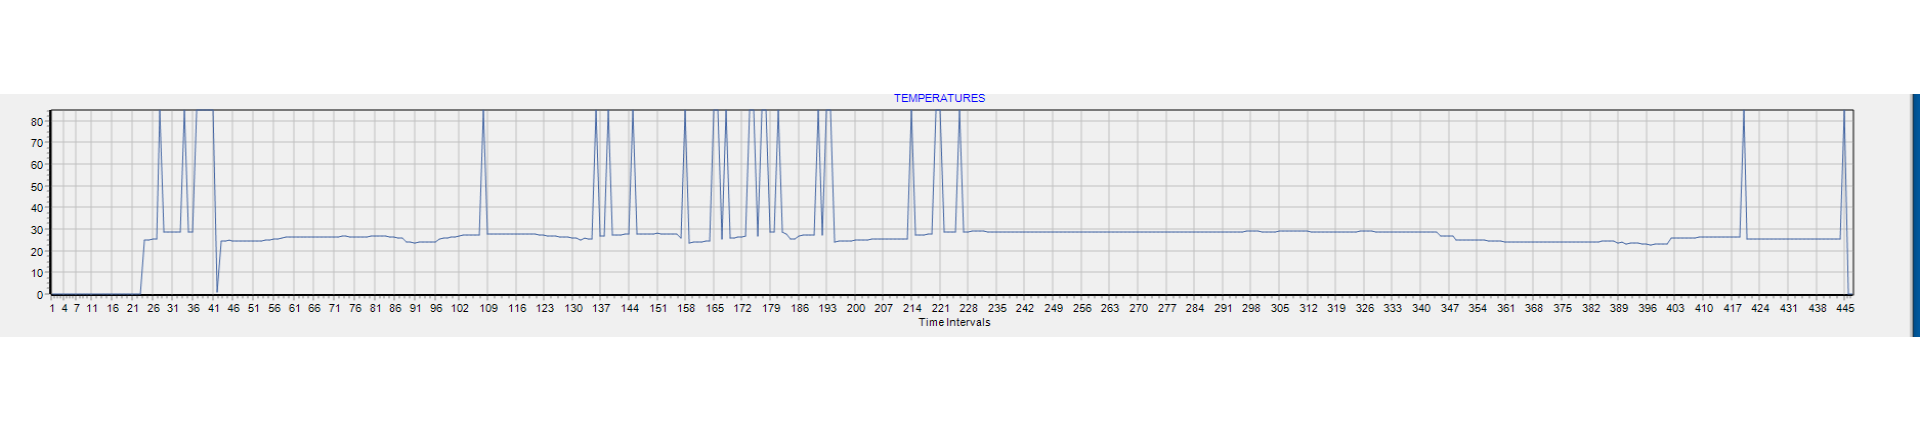
The Desktop application for KASSIE2 allows you to delete or export the records and view it in graphical format. Two sets of data are available form the app, the normal sequential uploads and the records that were dumped through the KASSIE2 menu. The DUMPED records are temperature data that is stored on the device itself between the normal uploads.
Main Features
1. Monitor up to 8 temperature probes (18B20)
2. Able to control up to 8 cooling units
3. Temperature Range : -55ºC to 125ºC
4. Temperature Resolution : 0.125ºC
5. Max Probe Distance : Up to 300m
6. IoT - Global Data Access
7. Actual/Historical/Graphical Reports
8. Email Notifications & Alarm Acknowledgements
9. Upload frequency options: every15min; 30min; 1hr , 3hr, 6hr
10. Wifi down Internal Storage : up to 1000 transactions
11. Database Records: 3 months, with unlimited option
12. Controlling High and Low limits for each probe.
The KASSIE2 Unit requires permanent 220V,50Hz power and 2.4G Wifi. When Wifi is unavailable, the unit will carry on storing up to a 1000 transactions for dumping later.
KASSIE2 is the next generation of the first product named KASSIE launched in 1990. The device is named after my father and late electrical contractor, "Kassie Hendriks", who inspired me with his passion for building the smartest cold rooms.
KASSIE2 Components
1. KASSIE2 Device
2. 8 x Sensor Stations
3. Probe Setup Cable
4. Kassie2Mobile App - Andriod
5. Kassie2Desktop App - Windows
6. Cloud database -MySQL
7. License information
KASSIE2 EXTERNAL CONNECTIONS
1.Programming Port
2. Setup Port
3. Data Line
4. External Alarm Switch
5. 220V/50Hz Power Supply
6. 2.4 G Wifi signal
KASSIE2 - NORMAL OPERATION
When setup properly, the device will run repeatedly through the following sequence:
1. Take sensor readings and upload data to webserver
2. Take sensor readings and save data internally
3. While waiting for the next scheduled upload, the device will :
(a) measure and display temperature one sensor after the other.
(b) For each of the 8 probes, switches a relay ON or OFF between the user defined temperature limits. Normally switch off when the LOW limit is reached, and ON again when the HIGH limit is reached.
(c) provide an option to enter the device's MENU
(d) repeat (a) and (c) continually - wait stage
4. Operation return back to step1.
All readings are taken and saved with datetime stamp.
KASSIE ALARM CONDITIONS
In the case of a sensor reporting a temperature outside the set limits, KASSIE2 will close the relay contacts which can in turn activate a siren or warning light (see electrical circuit). Warning Emails will also be sent to all interested parties. GMail on mobile phones make it convenient to get email notifications immediately. The email will contain the name of the alarming station, the temperature and date & time.
Relevant email addresses are required by PEETLAB to built it into the UPLOAD Command. In the MENU OPTIONS below, it will be explained how to reset a temperature alarm.
ALARM ACKNOWLEDGEMENTS
When an alarm email is received, the receiver may respond to acknowledge the notification whereby further alarm emails will not be send out on that day for that station.
Acknowledgements is done per probe station valid only for the day it is sent. The Acknowledgements is done via the Mobile Application only.
KASSIE2 MENU OPTIONS
The device will prompt the user (message on LCD) to enter the MENU. The message will appear regularly while in the wait stage. The WAIT stage is the time interval between the scheduled data uploads. On MENU prompt, the user must press the BLACK button to enter the MENU. The BLACK BUTTON will proceed to the next menu item while the RED BUTTON will SELECT a menu item. The response time of the buttons are relative slow, please wait 0.5 - 1.0 seconds before pressing again.
1. Reset the Temperature Alarm - disabled
2. Display each sensor's label & temperature limits
3. List Sensors/probes with serial numbers
4. Count the active number of sensors on the dataline
5. Dump Internal Data to the webserver
6. Reconnect to the Internet = disabled to save memory
7. Exit the MENU
KASSIE2 LEDs
There are four LEDs :
Blue : Indicates cooling is between the temperature limits
Green : Device is busy reading, saving or uploading data
Orange : Indicated the SETUP MODE has been entered.
Red : Indicates a temperature alarm condition.
The device continually indicates the status as it runs through the read,upload,save,setup and wait conditions.
KASSIE2MOBILE APP - Andriod only
Purpose of App :
1. To do the initial Setup of the device.
2. Accessing the Webserver and Temperature Reports.
Registering the App Online:
1. Run the app, click on Register
2. Read and Accept the Terms&Conditions (can be viewed)
3. Click on DOWNLOAD REGISTRATION
4. Wait for message "Download Complete!", then click OK.
5. Enter the code received from our office : +27 219138091
Company Name is required.
6. Click on Register, wait for message "Successful", then Exit
KASSIE2 SETUP
When the device is switched on, it will go by default into the SETUP mode until it has been marked as set up.
Initial Setup procedure to follow:
1. Power up and switch on the device.
2. Wait for the "Setup mode" message.
3. Go to the "Wifi Settings" of your mobile phone.
4. Select the KASSIE2 wifi network.
Default Password : heila
5. Open the KASSIE2MOBILE app.
6. Select SETUP HARDWARE
7. Select CONNECT
8. The following MENU will appear :
(a). Timer Setup
(b). Sensor Setup
(c). Wifi Setup
Complete each Setup Item.
TIMER SETUP - Kassie2Mobile App
Select the correct Date and Time to adjust the Date and Time of the device, then select one of five possible temperature reading frequencies (every 15min, 30min,1hr,3hr,6hr)
Click on UPDATE UNIT. The KASSIE2 Device will respond immediately by displaying the date/time sent on the LCD Display.
Click CLOSE on the app to select the next SETUP item.
CONNECTING OF PROBES
Black = GND; Red = 5V ; Yellow = Data
Connecting probes for setup
The temperature sensors (18B20) must be set up one by one. Each probe must be connected to the SETUP PORT (right side of the unit) through the included SETUP CABLE.
Procedure to follow :
(a) Unplug the SETUP cable from the port. (device can be switched on)
(b) Connect the probe/sensor wires.
(c) Plug in the SETUP cable (even when device is switched on)
(d) Proceed with the SENSOR SETUP
(e) Repeat steps (a) to (d) above for the other probes. One at a time.
Warning : Do not use the PROGRAMMING PORT on top of the device for this purpose.
Connecting probes for normal operation
Before connecting/adding/replacing any sensors/probes to the DATA LINE, the device must be switched off.
The device can then only be switched on with all the sensors wires properly connected in parallel to Vcc (5V), GND and Data.
SENSOR SETUP - Kassie2Mobile App
The temperature sensors (18B20) must be set up one by one. Each probe must be connected to the SETUP PORT (right side of the unit) through the included SETUP CABLE.
Warning : Do not use the PROGRAMMING PORT on top of the device for this purpose.
Then label the probe with any tag to identify it from other probes on the system. Giving it a name which identify a location is a good idea. The reports will refer to this name/label.
Example : Coldroom Front, Coldroom Door, Outside, Precooler..
Warning: See recommended procedure for connecting the probes.
(a). Select a Probe number ( Probe1 to Probe 8)
(b). Click GO
(c) Assign a name to the probe (label)
(d) Enter the LOW level value, and mark the checkbox with a tick if the value is negative. A temperature below this value will trigger an alarm.
(e).Enter the HIGH level value, and mark the checkbox with a tick if the value is negative. A temperature beyond this value will trigger an alarm.
(f). Check MAKE PROBE ACTIVE for the system to know which of the possible 8 temperature stations are used.
(g). Click SAVE. then.
(h). Click UPLOAD.
On UPLOAD, KASSIE2 will respond immediately. It will display the label of the probe on the first LCD line, and on the second LCD line it will display the probe station number, the low value, the high value and another 3 digits. The first two digits represent the sign of the values. "1" = negative, "0" = positive. The last digit : "1" = probe is marked active, "0" = probe is not marked active and system will ignore it on reports. The LCD display will last 3 seconds and it will read and show the serial number of the probe.
(i). Repeat steps (a) to (h) above for setting up the next probe or click CLOSE to exit the SENSOR SETUP page.
WIFI SETUP - Kassie2Mobile App
Select WIFI SETUP and enter the credentials of your Wifi access.
The fields must be entered one by one. After each field, click the RED UP ARROW next to the field to UPLOAD. The KASSIE2 device will then respond on the LCD Display with the value of the field sent.
(a). SSID & Password is required to access the internet on site.
(b). DUMP COMMAND - provided by PEETLAB. The command to dump temperature recordings saved by KASSIE2. It will upload to a seperate database on the webserver. Up to a 1000 readings (the latest values) are stored on the device itself.
(c). UPLOAD COMMAND - provided by PEETLAB. The command to upload actual values periodically on the website. The period is set in the TIMER SETUP menu = Temperature Reading Frequency.
(d). Check the UNIT SETUP COMPLETED field if you are finish with to total setup. By "checking" this field, the KASSIE2 device will not go automatically into the SETUP MODE after startup, it will instead link up to the internet and start uploading temperatures.
(e). Click CLOSE to exit the WIFI SETUP.
CLOSING THE KASSIE2MOBILE APP
To finish the setup, click on DISCONNECT to leave the SETUP MODE and break the WIFI connection between the MobileApp and the KASSIE2 device, which is only required during setup.
ENTER SETUP MODE AFTER THE INITIAL SETUP
To add/delete probes at a later stage, device must be switched off, wait for 10 seconds, switch on again. Wait for the setup mode message to appear and press and hold both buttons for at least 3 seconds. The device will go into the SETUP MODE
KASSIE2 - MOBILE APP REPORT
Wherever Internet connectivity is available, temperatures with datetime stamp per station can be viewed. The number of mobile installations for interested parties is not limited.
KASSIE2 - DESKTOP APP
The Desktop application for KASSIE2 allows you to delete or export the records and view it in graphical format. Two sets of data are available form the app, the normal sequential uploads and the records that were dumped through the KASSIE2 menu. The DUMPED records are temperature data that is stored on the device itself between the normal uploads.
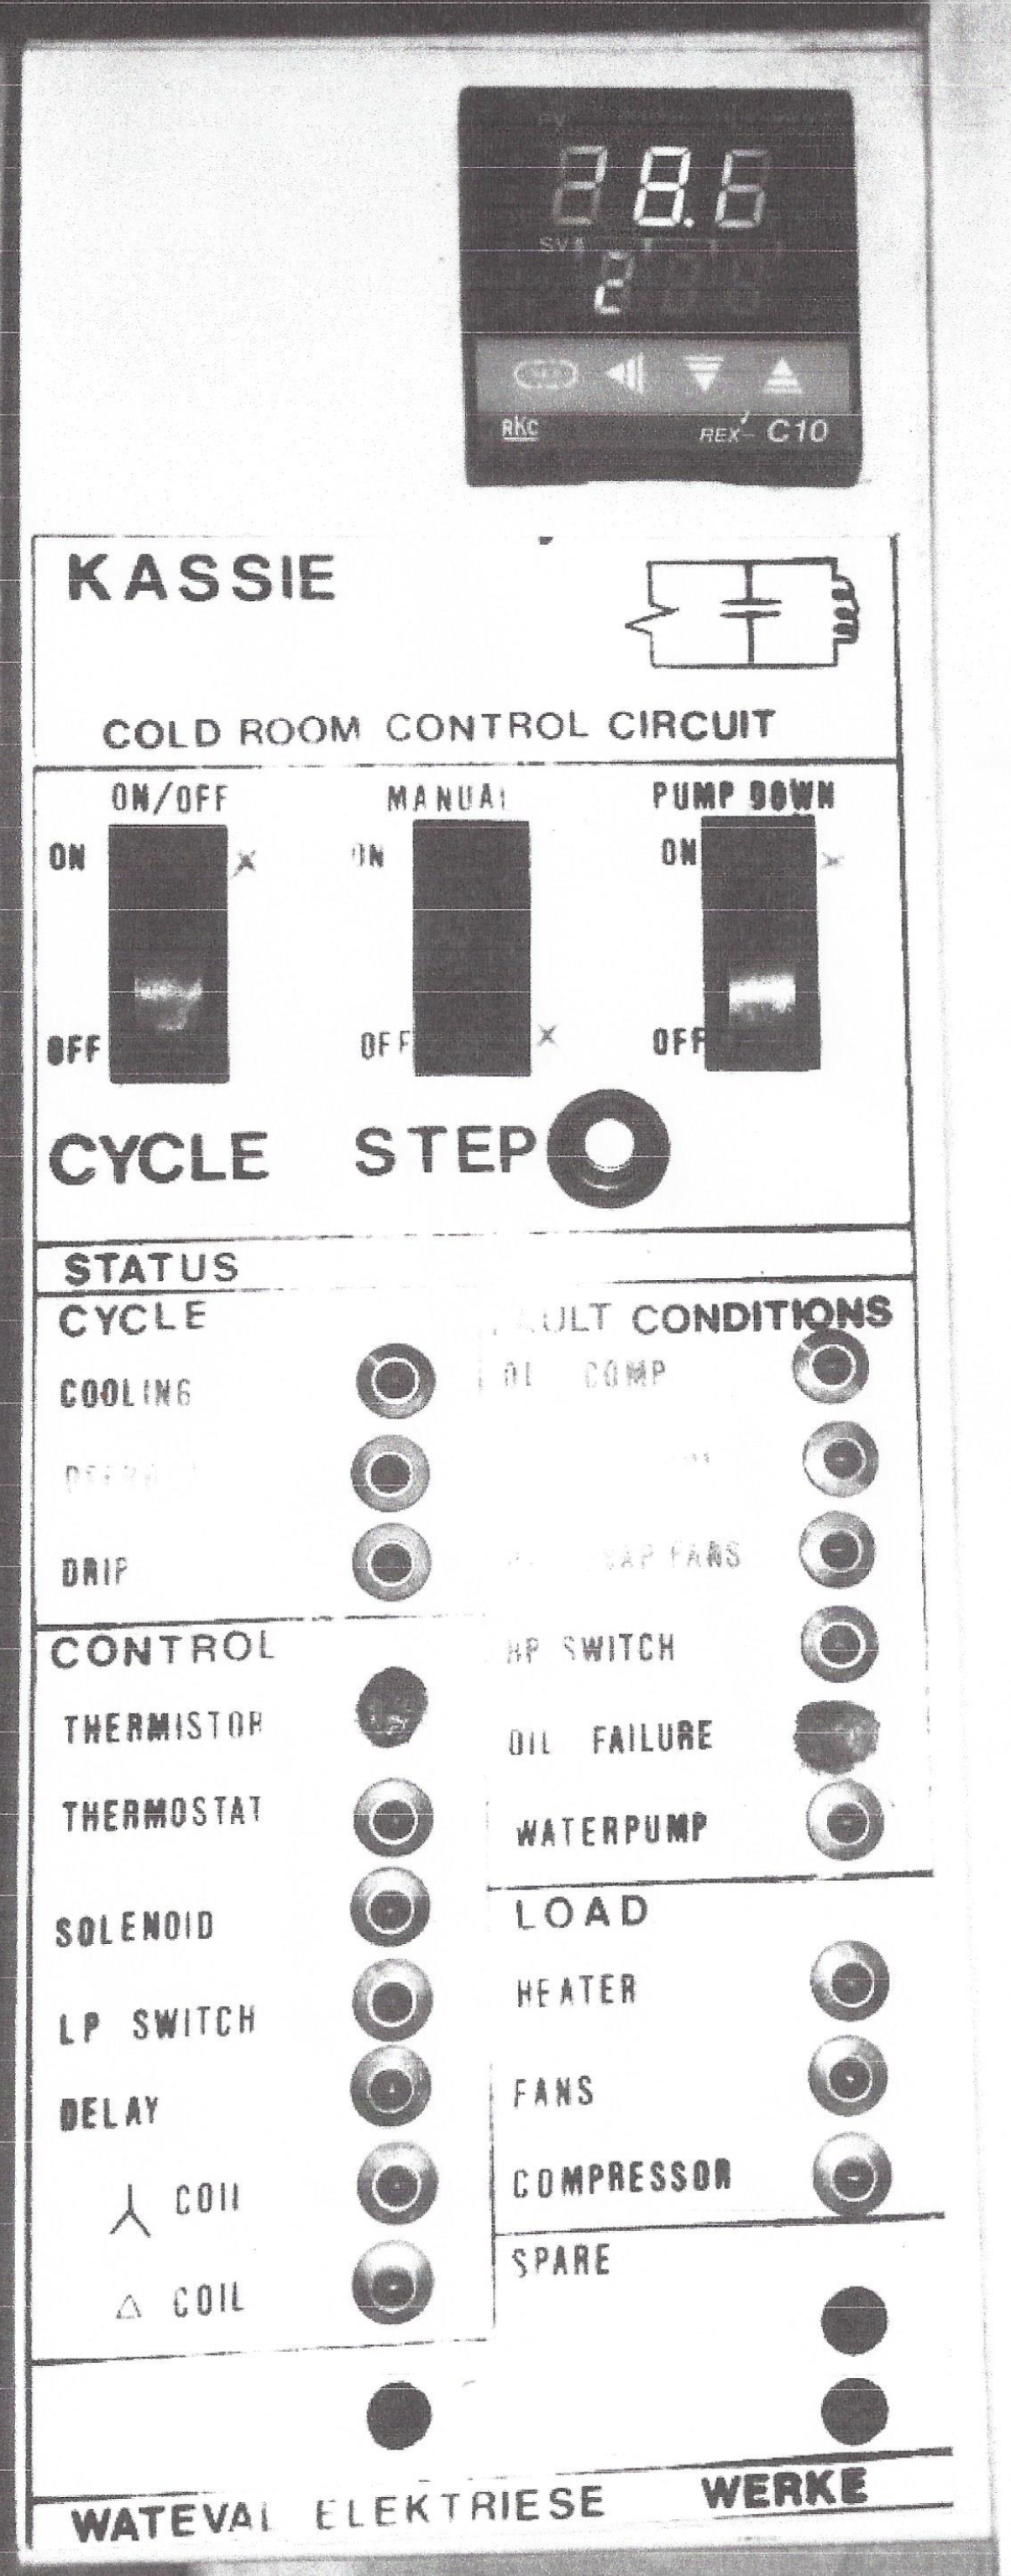
KASSIE1 - Made in 1990 is still operational.

KASSIE2 DESKTOP GRAPHICAL DISPLAY
Refresh Page = Crtl +F5
Contact Details : Peet Hendriks
Mobile : +27 (0) 72 353 2495
Mobile : +27 (0) 72 353 2495